基于vLLM与SGLang部署DeepSeek-r1-32B模型

1 前言

个人体验DeepSeek-R1时可以采用ollama部署,操作过程比较简单,一键部署运行,但是这种方式的灵活性与可扩展性较低,可能无法与企业现有架构和工具链相匹配,因此企业中部署时通常不会采用这种方式

下面介绍一种生产可用的部署方式,基于vLLM/SGLang部署DeepSeek-R1-1.5B及DeepSeek-R1-32B模型,并部署Open-WebUI测试与模型进行问答,测试模型可用性

本文基于conda虚拟环境在Linux主机部署,基于环境隔离与复用性考虑,更加推荐容器部署方式,后续会尝试

模型文件下载可以从huggingface或ModelScope:

2 安装nvidia驱动

环境说明

1
2
操作系统:ubuntu2204
显卡:nvidia A800*2

下载驱动

Nvidia官网可以下载驱动,选择显卡型号、系统版本后就可以下载到驱动包

下载地址

1
https://cn.download.nvidia.cn/tesla/570.158.01/nvidia-driver-local-repo-ubuntu2204-570.158.01_1.0-1_amd64.deb

安装驱动

1
2
3
4
5
6
7
8
9
10
11
12
13
14
15
16
17
18
19
20
21
22
23
24
25
26
27
28
29
30
31
32
33
34
35
36
37
38
39
40
41
42
43
44
45
46
47
48
49
50
51
52
53
54
55
56
57
#安装驱动
dpkg -i nvidia-driver-local-repo-ubuntu2204-570.158.01_1.0-1_amd64.deb
#安装秘钥
cp /var/nvidia-driver-local-repo-ubuntu2204-570.158.01/nvidia-driver-local-32B90C93-keyring.gpg /usr/share/keyrings/
#查看可以安装的驱动
apt update
ubuntu-drivers devices

# ubuntu-drivers devices
ERROR:root:aplay command not found
== /sys/devices/pci0000:97/0000:97:02.0/0000:98:00.0 ==
modalias : pci:v000010DEd000020F5sv000010DEsd00001799bc03sc02i00
vendor : NVIDIA Corporation
driver : nvidia-driver-535-server-open - distro non-free
driver : nvidia-driver-570-server-open - distro non-free
driver : nvidia-driver-550 - distro non-free
driver : nvidia-driver-535-open - distro non-free
driver : nvidia-driver-570 - third-party non-free recommended
driver : nvidia-driver-570-open - third-party non-free
driver : nvidia-driver-545 - distro non-free
driver : nvidia-driver-550-open - distro non-free
driver : nvidia-driver-535-server - distro non-free
driver : nvidia-driver-545-open - distro non-free
driver : nvidia-driver-570-server - distro non-free
driver : nvidia-driver-535 - distro non-free
driver : xserver-xorg-video-nouveau - distro free builtin

#安装驱动
apt -y install nvidia-driver-570

#查看GPU信息
# nvidia-smi
Mon Jun 30 08:14:06 2025
+-----------------------------------------------------------------------------------------+
| NVIDIA-SMI 570.158.01 Driver Version: 570.158.01 CUDA Version: 12.8 |
|-----------------------------------------+------------------------+----------------------+
| GPU Name Persistence-M | Bus-Id Disp.A | Volatile Uncorr. ECC |
| Fan Temp Perf Pwr:Usage/Cap | Memory-Usage | GPU-Util Compute M. |
| | | MIG M. |
|=========================================+========================+======================|
| 0 NVIDIA A800 80GB PCIe Off | 00000000:17:00.0 Off | 0 |
| N/A 31C P0 68W / 300W | 0MiB / 81920MiB | 1% Default |
| | | Disabled |
+-----------------------------------------+------------------------+----------------------+
| 1 NVIDIA A800 80GB PCIe Off | 00000000:98:00.0 Off | 0 |
| N/A 29C P0 69W / 300W | 0MiB / 81920MiB | 1% Default |
| | | Disabled |
+-----------------------------------------+------------------------+----------------------+

+-----------------------------------------------------------------------------------------+
| Processes: |
| GPU GI CI PID Type Process name GPU Memory |
| ID ID Usage |
|=========================================================================================|
| No running processes found |
+-----------------------------------------------------------------------------------------+

3 部署Miniconda3环境

下载部署脚本

1
wget https://repo.anaconda.com/miniconda/Miniconda3-latest-Linux-x86_64.sh

安装脚本

1
2
3
4
5
6
7
8
9
10
11
12
13
14
15
16
17
18
19
20
21
22
23
24
25
26
27
28
29
30
31
32
33
34
35
36
37
38
39
40
chmod +x Miniconda3-latest-Linux-x86_64.sh
./Miniconda3-latest-Linux-x86_64.sh

#交互式安装
In order to continue the installation process, please review the license
agreement.
Please, press ENTER to continue
>>> #按ENTER浏览License
Do you accept the license terms? [yes|no]
>>>
Please answer 'yes' or 'no':'
>>> yes #yes回车同意接受License

Miniconda3 will now be installed into this location:
/root/miniconda3

- Press ENTER to confirm the location
- Press CTRL-C to abort the installation
- Or specify a different location below

[/root/miniconda3] >>> /usr/local/models/miniconda3 #默认会装到/root/miniconda3下,也可以自定义路径

Do you wish to update your shell profile to automatically initialize conda?
This will activate conda on startup and change the command prompt when activated.
If you'd prefer that conda's base environment not be activated on startup,
run the following command when conda is activated:

conda config --set auto_activate_base false

You can undo this by running `conda init --reverse $SHELL`? [yes|no]
[no] >>> yes #登录shell时自动激活conda,输入yes

==> For changes to take effect, close and re-open your current shell. <==

Thank you for installing Miniconda3!

#重新登录shell生效

# conda --version
conda 25.5.1

4 部署运行模型

4.1 方式1:vLLM运行模型

创建虚拟化python环境(vllm运行环境)

1
conda create -p /usr/local/models/myenv python=3.13

激活环境

1
2
3
4
(base) root@gpu:~# conda activate /usr/local/models/myenv

#注意前面的前缀会改变
(/usr/local/models/myenv) root@gpu:~#

配置pypi源:默认比较慢,修改为阿里云地址

1
2
3
4
5
6
7
8
mkdir ~/.pip
cat > ~/.pip/pip.conf <<EOF
[global]
index-url = http://mirrors.aliyun.com/pypi/simple/

[install]
trusted-host=mirrors.aliyun.com
EOF

安装依赖

1
2
3
4
5
6
7
8
9
10
11
12
13
14
15
16
17
18
19
20
21
22
23
24
25
26
###1.安装 PyTorch + CUDA 11.8
(/usr/local/models/myenv) root@gpu:~# pip install torch torchvision torchaudio --index-url https://download.pytorch.org/whl/cu118
#验证安装
python -c "import torch; print(f'PyTorch版本: {torch.__version__}\nCUDA可用: {torch.cuda.is_available()}')"

###2.安装 Rust工具链
#2.1在线安装
curl --proto '=https' --tlsv1.2 -sSf https://sh.rustup.rs | sh -s -- -y

#2.2离线安装
wget https://static.rust-lang.org/dist/rust-1.88.0-x86_64-unknown-linux-gnu.tar.xz
cd rust*
./install.sh --prefix=/usr/local --without=rust-docs # 跳过文档以节省空间

#2.3验证安装
rustc --version
cargo --version


###3.安装cuda-toolkit
wget https://developer.download.nvidia.com/compute/cuda/repos/ubuntu2204/x86_64/cuda-keyring_1.1-1_all.deb
dpkg -i cuda-keyring_1.1-1_all.deb
apt update
apt install cuda-toolkit-12-2
#如果部署过程中还有报错,可能也需要装nvidia-cuda-toolkit
apt install nvidia-cuda-toolkit

安装modelscope、vllm模块

1
2
3
4
5
6
(/usr/local/models/myenv) root@gpu:~# pip install modelscope vllm

#耗时较长
(/usr/local/models/myenv) root@gpu:~# pip list | egrep -i "(vllm|modelscope)"
modelscope 1.27.1
vllm 0.8.3

下载模型文件

1
2
3
4
5
6
7
8
9
10
11
12
13
###方式1:使用git下载:需要安装git-lfs包
apt install git-lfs

#下载到指定目录:计划测试部署1.5B与32B,因此下载两个模型
mkdir /usr/local/models/models
cd /usr/local/models/models
git clone https://www.modelscope.cn/deepseek-ai/DeepSeek-R1-Distill-Qwen-1.5B.git
git clone https://www.modelscope.cn/deepseek-ai/DeepSeek-R1-Distill-Qwen-32B.git

####方式2:使用modelscope下载
#通过环境变量方式指定目录,而后下载
export MODELSCOPE_CACHE=/usr/local/models/models
modelscope download --model deepseek-ai/DeepSeek-R1-Distill-Qwen-1.5B

运行模型

1
2
3
4
5
6
7
8
9
10
11
12
13
14
15
16
17
18
19
20
21
22
23
24
25
26
27
28
29
30
31
32
33
34
35
36
37
38
39
40
41
42
43
44
45
46
(/usr/local/models/myenv) root@gpu:~# VLLM_USE_MODELSCOPE=true vllm serve /usr/local/models/models/DeepSeek-R1-Distill-Qwen-1.5B --tensor-parallel-size 2 --max-model-len 32768 --gpu-memory-utilization 0.95 --dtype bfloat16 --served-model-name DeepSeek-R1-32B

#参数含义
--tensor-parallel-size 2 # 张量并行度(=GPU数量)
--max-model-len 32768 # 最大上下文长度
--gpu-memory-utilization 0.95 # 显存利用率上限
--dtype bfloat16 #指定模型精度


#模型启动检查
#日志显示启动成功
INFO: Started server process [206740]
INFO: Waiting for application startup.
INFO: Application startup complete.

#端口
(base) root@gpu:/usr/local/models/models# netstat -tnlp | grep 8000
tcp 0 0 0.0.0.0:8000 0.0.0.0:* LISTEN 206740/python3.13

#查看GPU信息:发现显存使用率已经升上来了
(base) root@gpu:/usr/local/models/models# nvidia-smi
Tue Jul 1 15:52:22 2025
+-----------------------------------------------------------------------------------------+
| NVIDIA-SMI 570.158.01 Driver Version: 570.158.01 CUDA Version: 12.8 |
|-----------------------------------------+------------------------+----------------------+
| GPU Name Persistence-M | Bus-Id Disp.A | Volatile Uncorr. ECC |
| Fan Temp Perf Pwr:Usage/Cap | Memory-Usage | GPU-Util Compute M. |
| | | MIG M. |
|=========================================+========================+======================|
| 0 NVIDIA A800 80GB PCIe Off | 00000000:17:00.0 Off | 0 |
| N/A 30C P0 66W / 300W | 77879MiB / 81920MiB | 0% Default |
| | | Disabled |
+-----------------------------------------+------------------------+----------------------+
| 1 NVIDIA A800 80GB PCIe Off | 00000000:98:00.0 Off | 0 |
| N/A 27C P0 65W / 300W | 77879MiB / 81920MiB | 0% Default |
| | | Disabled |
+-----------------------------------------+------------------------+----------------------+

+-----------------------------------------------------------------------------------------+
| Processes: |
| GPU GI CI PID Type Process name GPU Memory |
| ID ID Usage |
|=========================================================================================|
| 0 N/A N/A 207341 C ...l/models/myenv/bin/python3.13 77870MiB |
| 1 N/A N/A 207358 C ...l/models/myenv/bin/python3.13 77870MiB |
+-----------------------------------------------------------------------------------------+

4.2 方式2:SGLang运行模型

创建虚拟化python环境(sglang运行环境)

1
conda create -p /usr/local/models/sglang python=3.11

激活环境

1
2
3
4
conda activate /usr/local/models/sglang

#注意前面的前缀会改变
(/usr/local/models/sglang) root@gpu:~#

安装SGLang模块

1
2
3
4
5
6
#安装依赖
(/usr/local/models/sglang) root@gpu:~# apt install nvidia-cuda-toolkit


#安装SGLang
(/usr/local/models/sglang) root@gpu:~# pip install sglang[all]

注意:方式1中已经下载过模型,此处不再下载

运行模型

1
2
3
4
5
6
7
8
9
10
11
12
13
14
15
16
17
18
19
20
21
22
23
24
25
26
27
28
29
30
31
32
33
34
35
36
37
38
39
40
41
42
43
44
45
46
47
48
49
50
51
52
53
54
55
56
57
58
59
60
61
62
63
64
65
66
67
68
69
70
71
72
73
74
75
76
77
78
79
80
81
82
83
84
85
86
87
88
89
90
91
92
93
94
95
#注意: 确保CUDA_HOME环境变量已设置,如果没有设置会报错!!!!
In file included from /usr/include/crt/math_functions.h:9075,
from /usr/include/crt/common_functions.h:303,
from /usr/include/cuda_runtime.h:115,
from <command-line>:
/usr/include/c++/11/cmath:45:15: fatal error: math.h: No such file or directory
45 | #include_next <math.h>
| ^~~~~~~~
compilation terminated.
fatal : Could not open input file /tmp/tmpxft_0003aaba_00000000-7_batch_prefill_ragged_kernel_mask_2.cpp1.ii
ninja: build stopped: subcommand failed.

Possible solutions:
1. set --mem-fraction-static to a smaller value (e.g., 0.8 or 0.7)
2. set --cuda-graph-max-bs to a smaller value (e.g., 16)
3. disable torch compile by not using --enable-torch-compile
4. disable CUDA graph by --disable-cuda-graph. (Not recommended. Huge performance loss)
Open an issue on GitHub https://github.com/sgl-project/sglang/issues/new/choose


[2025-07-02 11:51:47] Received sigquit from a child process. It usually means the child failed.
[2025-07-02 11:51:47] Received sigquit from a child process. It usually means the child failed.
Killed


#设置环境变量
echo $CUDA_HOME
#设置方式
#设置方式1
export CUDA_HOME=/usr/local/cuda-12.2
#设置方式2
echo "export CUDA_HOME=/usr/local/cuda-12.2" >> ~/.bashrc
source ~/.bashrc


#启动
SGLANG_USE_MODELSCOPE=true python3 -m sglang.launch_server --model /usr/local/models/models/DeepSeek-R1-Distill-Qwen-32B --trust-remote-code --tp 2 --dtype bfloat16 --api-key 123456 --served-model-name DeepSeek-R1-32B --mem-fraction-static 0.9

#参数含义
--model #指定模型
--trust-remote-code #信任远程代码
--tp 2 # 张量并行度(=GPU数量)
--dtype bfloat16 #指定模型精度
--api-key 123456 #API密钥
--served-model-name DeepSeek-R1-32B #模型名

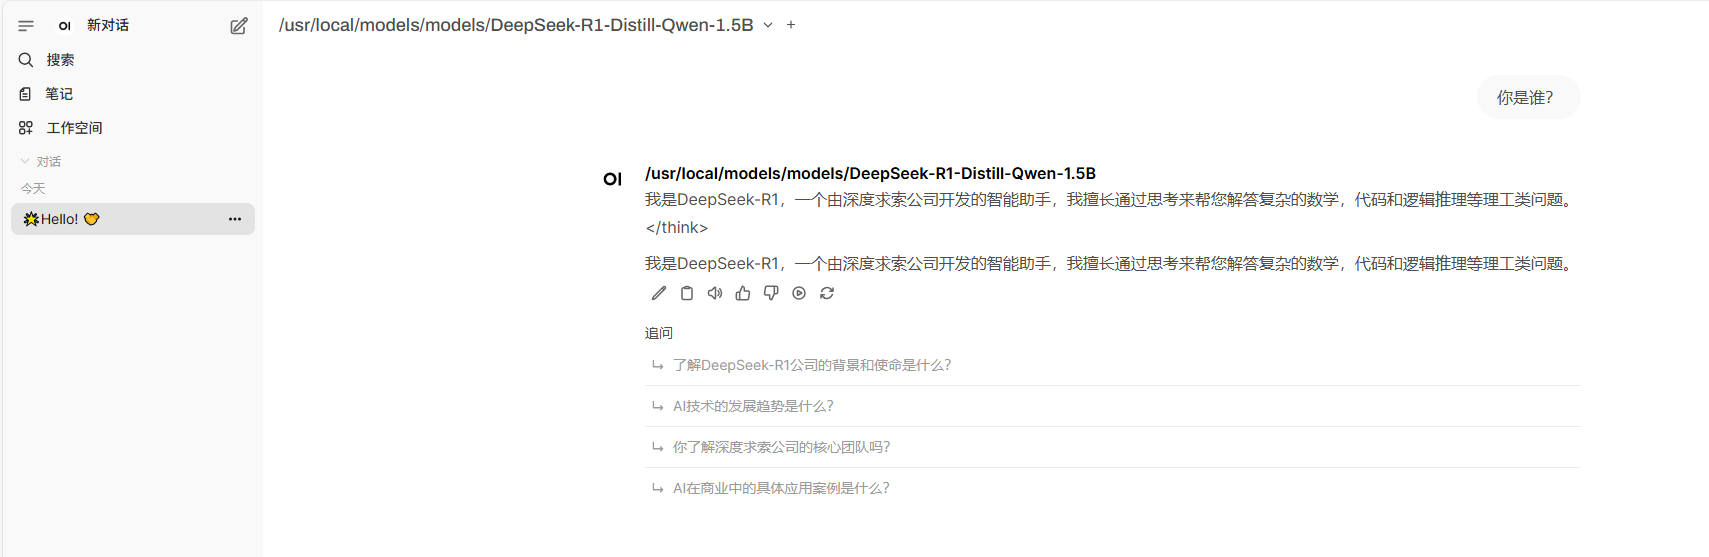
#模型启动检查
#日志显示启动成功
[2025-07-02 11:53:43] INFO: Started server process [240755]
[2025-07-02 11:53:43] INFO: Waiting for application startup.
[2025-07-02 11:53:43] INFO: Application startup complete.
[2025-07-02 11:53:43] INFO: Uvicorn running on http://127.0.0.1:30000 (Press CTRL+C to quit)
[2025-07-02 11:53:44] INFO: 127.0.0.1:55666 - "GET /get_model_info HTTP/1.1" 200 OK
[2025-07-02 11:53:49] INFO: 127.0.0.1:55680 - "POST /generate HTTP/1.1" 200 OK
[2025-07-02 11:53:49] The server is fired up and ready to roll!

#端口
(base) root@gpu:/usr/local/models/models# netstat -tnlp | grep 30000
tcp 0 0 127.0.0.1:30000 0.0.0.0:* LISTEN 240755/python3

#查看GPU信息:发现显存使用率已经升上来了
(base) root@gpu:/usr/local/models/models# nvidia-smi
Tue Jul 1 15:52:22 2025
+-----------------------------------------------------------------------------------------+
| NVIDIA-SMI 570.158.01 Driver Version: 570.158.01 CUDA Version: 12.8 |
|-----------------------------------------+------------------------+----------------------+
| GPU Name Persistence-M | Bus-Id Disp.A | Volatile Uncorr. ECC |
| Fan Temp Perf Pwr:Usage/Cap | Memory-Usage | GPU-Util Compute M. |
| | | MIG M. |
|=========================================+========================+======================|
| 0 NVIDIA A800 80GB PCIe Off | 00000000:17:00.0 Off | 0 |
| N/A 30C P0 66W / 300W | 77879MiB / 81920MiB | 0% Default |
| | | Disabled |
+-----------------------------------------+------------------------+----------------------+
| 1 NVIDIA A800 80GB PCIe Off | 00000000:98:00.0 Off | 0 |
| N/A 27C P0 65W / 300W | 77879MiB / 81920MiB | 0% Default |
| | | Disabled |
+-----------------------------------------+------------------------+----------------------+

+-----------------------------------------------------------------------------------------+
| Processes: |
| GPU GI CI PID Type Process name GPU Memory |
| ID ID Usage |
|=========================================================================================|
| 0 N/A N/A 207341 C ...l/models/myenv/bin/python3.13 77870MiB |
| 1 N/A N/A 207358 C ...l/models/myenv/bin/python3.13 77870MiB |
+-----------------------------------------------------------------------------------------+

5 部署open-webui

创建虚拟化python环境(open-webui运行环境)

1
2
#注意:python版本需要为3.11/3.12
conda create -p /usr/local/models/open-webui python=3.11

激活环境

1
2
3
4
conda activate /usr/local/models/open-webui

#注意前面的前缀会改变
(/usr/local/models/open-webui) root@gpu:~#

安装open-webui

1
(/usr/local/models/open-webui) root@gpu:~# pip install open-webui

启动open-webui

1
2
3
4
5
(/usr/local/models/open-webui) root@gpu:~# open-webui serve

#确认端口
(base) root@gpu:/usr/local/models/models# netstat -tnlp | grep 8080
tcp 0 0 0.0.0.0:8080 0.0.0.0:* LISTEN 212252/python3.11

访问页面

http://127.0.0.1:8080/,设置密码后可以登录

配置模型连接

依次点击:管理员面板–设置–外部连接–管理OpenAI API连接–编辑连接(秘钥:SGLang支持,vllm部署不支持)

1
2
URL: http://127.0.0.1:8000/v1
秘钥: 123456

首页可以选择到模型,并进行对话测试


基于vLLM与SGLang部署DeepSeek-r1-32B模型
https://ikuma.top/2025/07/02/基于vLLM与SGLang部署DeepSeek-r1-32B模型/
作者
Kuma
发布于
2025年7月2日
许可协议